A Day In the Life of an Endangered Species Intern

I wrote this for my MatadorU travel writing course, and thought it would be fun to share here. It’s about some of the field work I was doing while I was in South Carolina last year.

When I leave the house in the morning it is dark enough to use the brights. I drive my truck along a paved road, which turns to dirt. The packed dirt is first tan, then reddish-orange, then almost white. A nightjar stares me down from the middle of the road, but as I slow it flies off into the dark.

———————————————————————————————–


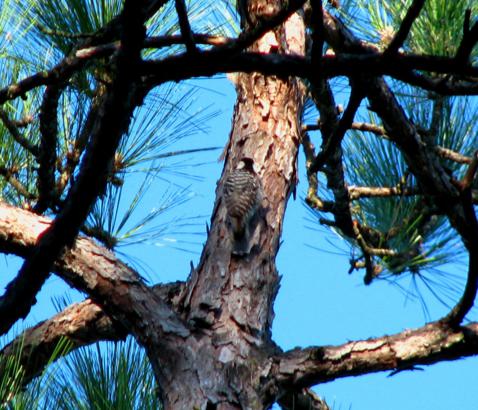
A red-cockaded woodpecker foraging in a pine. Note the black and white barring on the back, white cheek patches, and black hood. The males will have small red patches on the back of their heads, which typically can’t be seen unless the bird is riled up and raises its feathers.

———————————————————————————————–

The dark is softer when I arrive at Compartment 20, my destination. I wait in the truck, drinking tea from my thermos and listening to the radio, until the sky lightens. Just before sunrise I take one last sip and then slip into place with my spotting scope, binoculars, and notebook. I position myself about 100 yards from the nearest cavity tree and wait. The cavity I’m watching, a dark hole about 25 feet off the ground, partially hidden between branches, looks lifeless.

After ten minutes I see what I’ve come for: a red-cockaded woodpecker (RCW) bursts out into the morning, chattering loudly. It forages in a nearby tree, tapping here and there on the bark, flaking off pieces that swivel to the ground. After a few minutes another RCW joins, and the two flit from tree to tree calling and foraging, taking stock of the day.

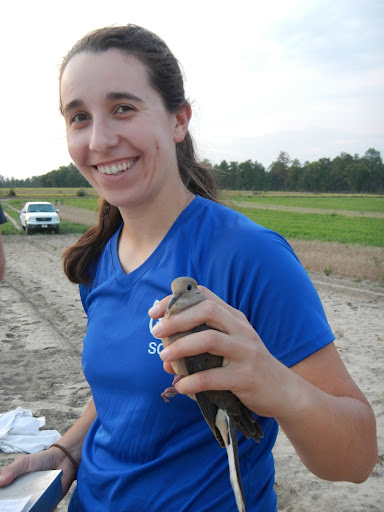
Fully grown, an RCW is the size of a robin with black and white stripes running across its back, sometimes called a ladder back. Like clowns, they have giant white cheek patches and tiny black caps. The males have red cockades, or small red patches, on each side of their black caps.

I follow the pair for the better part of an hour before I leave them to their business. Back at the truck I take a sip of now-cold tea before reading through my notes. Both RCWs were unbanded, which means they had not been captured and fitted with aluminum USGS numbered bands or colored plastic bands, which we use to identify individual birds. Because there were just the two of them, they are most likely a potential breeding pair, or a pair of mated RCWs who for whatever reason didn’t nest this year.

I was out this morning doing an early morning nest check, observing what was going on in a particular cluster of RCW cavity trees. These checks help to determine the overall breeding status and size of the RCW population on the refuge. They also mean that I get to spend early mornings in the woods staring at trees, hoping birds will show up so I can follow them and see what they’re up to.

In 2012 I spent three months as an endangered species intern, studying RCWs with the biologists at Carolina Sandhills National Wildlife Refuge. My internship, arranged through the Student Conservation Association, provided me with the opportunity to do hands-on conservation biology and work with government biologists to study an endangered species, a bird that few have heard of, let alone seen. My background in biology, and specifically ornithology, the study of birds, has taken me around the country to different wildlife refuges and protected areas, where I’ve had the privilege to experience many different aspects of the natural world.

Carolina Sandhills is located just outside of McBee, South Carolina, which is located just outside of the middle of nowhere.  As a local intern explained to me, towns in the region are defined by whether or not they have a Wal-Mart. McBee does not have a Wal-Mart.

———————————————————————————————–


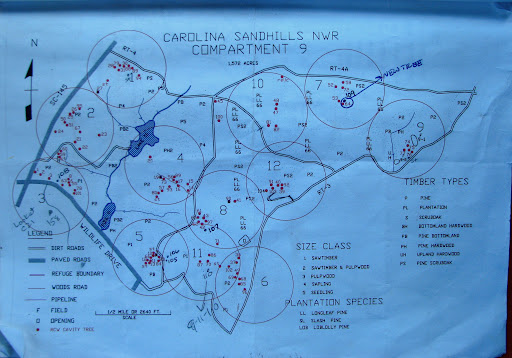
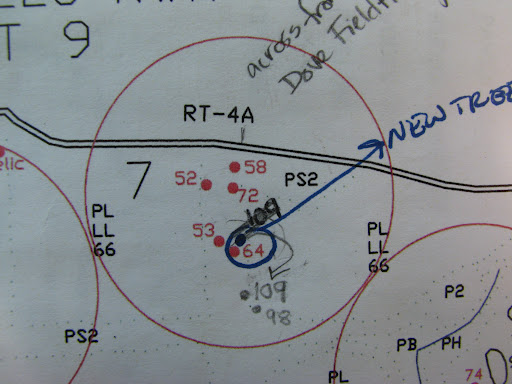
Carolina Sandhills NWR is divided into 21 compartments; each typically has 10-12 clusters of cavity trees. The maps give us an approximate idea of where the trees are, and we then find them on foot using a compass and a large dash of intuition. It sometimes took a while to find particular trees, as the maps are not entirely accurate.

———————————————————————————————–

Red-cockaded woodpeckers (Picoides borealis) have been on the endangered species list since 1970, and the current population is estimated to be about 12,500. Like many endangered species, RCWs are closely tied to their habitat, in their case the longleaf pine ecosystem. There once were about 90 million acres of longleaf habitat spreading across the eastern United States, from New Jersey south to Florida and west to Texas, Oklahoma, and Missouri. Only 2 million acres remain, in mostly isolated patches scattered through the southeast.

That much ecosystem doesn’t just disappear on its own. Logging, agriculture, the turpentine industry, tree farming, and urbanization, along with the suppression of natural fires, contributed to the decline of longleaf pine. Of these, burning is perhaps the most critical, because when fires are suppressed the composition of the forests changes. Fewer fires promote the growth of hardwoods, which the RCWs have no use for. They need pines, and pines need fire.

Natural fires, caused by lightning strikes, are typically low-intensity burns. These fires incinerate the fallen needles and grasses and leave mature trees undamaged. This keeps the area around the longleaf cleared, reducing competition and providing open areas for their seeds to quickly absorb nutrients from the ash. Longleaf pine forests are typically composed of just longleaf; there is an obvious lack of mid-story trees. The ground is covered with a high diversity of plants, all of which benefit from fire as well. Frequent forest fires “acted as the thread which held the longleaf pine forest together (1).”

RCWs are the only woodpeckers that nest in living pines. Connoisseurs, they prefer their trees aged: old-growth longleaf pine being most favored. The best longleaf will have red-heart disease, which softens the heartwood enough for the birds to easily excavate a cavity, anywhere from 10 to 80 feet off the ground. Longleaf pines have a high resin yield, and are very sticky trees. RCWs will open up sap wells all over the tree, which are especially good at keeping away rat snakes that will try to climb up and eat their eggs and nestlings. It is easy to spot cavity trees once you know what to look for—a large reddish section of bark midway up the tree, encrusted with sap.

Biologists (and interns) monitor most of the trees on the refuge with cavities, of which there are over 1,300. Thankfully, we only need to monitor the ones with recent activity, about a third of the cavity trees. The refuge is 45,348 acres, so there is a great deal of driving and hiking involved in this line of work.

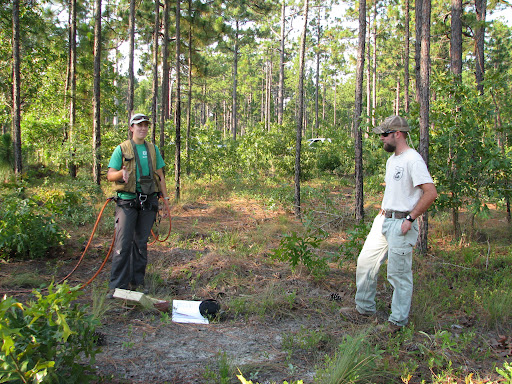
Later in the morning, I drive to the office to fill out the official observation form for Nancy, the refuge biologist. Grabbing up my notebook and the spotting scope, I head inside.

“So how did it go out there?”  Nancy asks.

“I had two. They stayed mostly in Compartment 20, then headed towards that farm across the road off the refuge, then back towards Compartment 21.”

“That’s interesting; I wonder why they went over there. Ok, good. I thought I had heard birds out there during nest checks. Did they have bands?

———————————————————————————————–


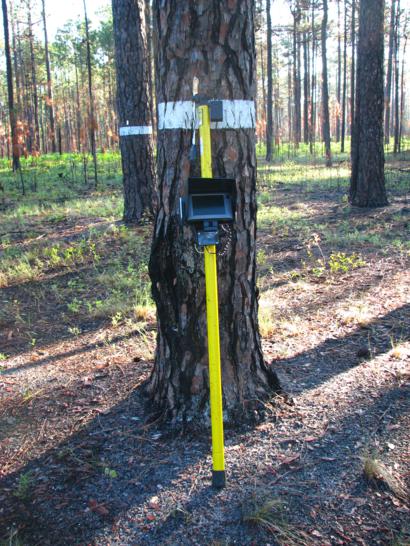
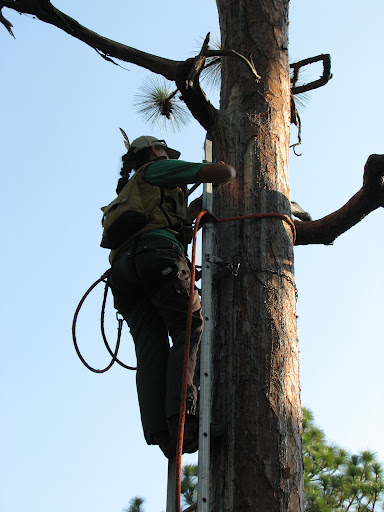
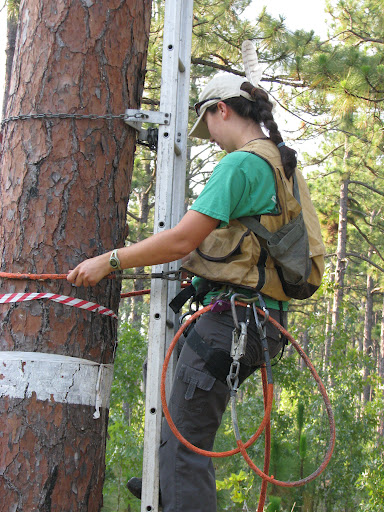
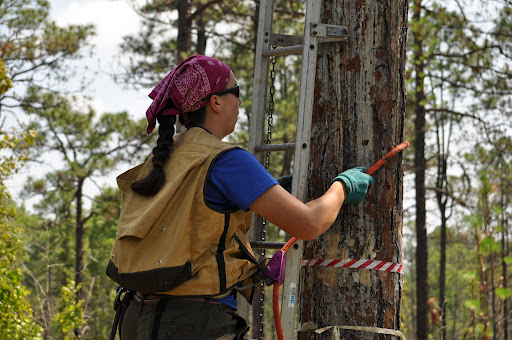
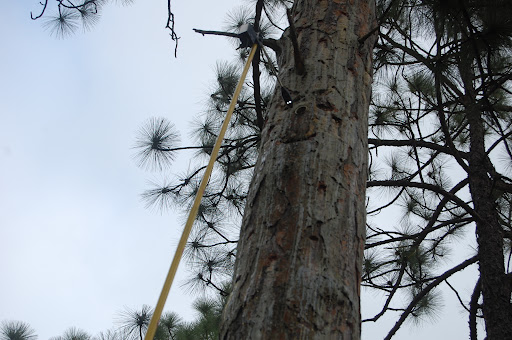
My peeper, leaning on a marked cavity tree. All known cavity trees are marked with a broad band of white paint to help not only biologists but also the firefighters who set prescribed burns on the refuge identify them. Peepers are about five feet tall and extend up to 35 feet. 

———————————————————————————————–

“Nope, both unbanded.”

“What trees were you watching?”

“I was set up on 93, and the first RCW came from the cavity near the top of the tree. The other came from behind me, probably 97.”

We talk a little more about details of my observations, and Nancy shares her morning experiences in a different compartment. I fill out the official observation form, and she gives me my instructions for the day. I have five trees to inspect, checking up on nestlings we banded about two weeks ago.

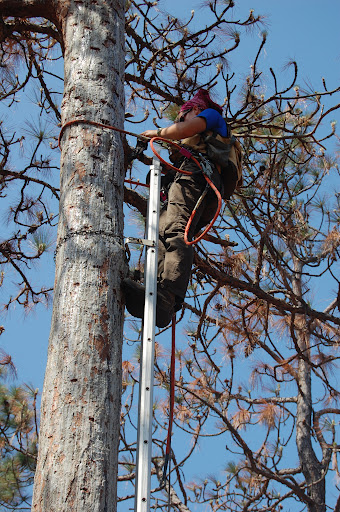
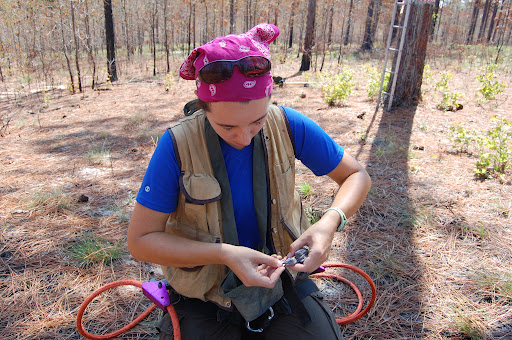
“How’s your peeper been working?” she asks. Peepers are cameras on telescoping poles, which we use to ‘peep’ into RCW cavities. They keep us from having to climb the trees so we can make our observations more quickly, which means less stress for the birds, though not always for us. RCW cavity openings are about 2 inches in diameter, and directing a camera head smaller than your fist into a 2 inch hole 30 feet or so above the ground takes a bit of skill and practice. As a rule, the sun will be in your eyes, it will be windy, and/or there will be branches in the way.

“Okay I guess, but sometimes the arm that holds the camera up doesn’t stay tight, so when I pull it out of the cavity it flops straight down, and then I have to lower the entire thing and re-adjust it if I need another look, which is a pain.”

———————————————————————————————–


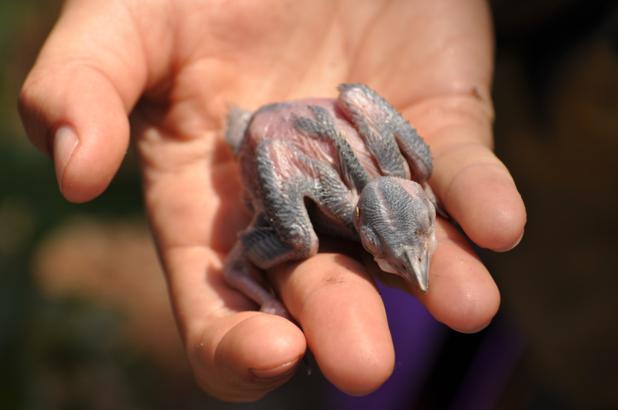
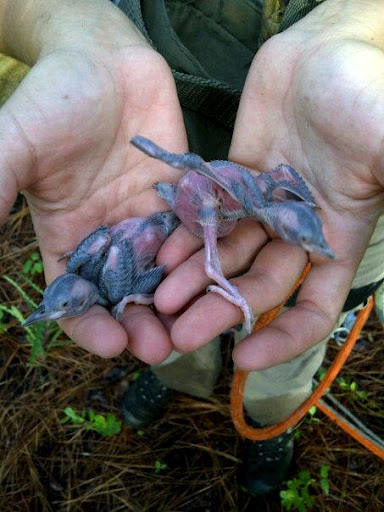
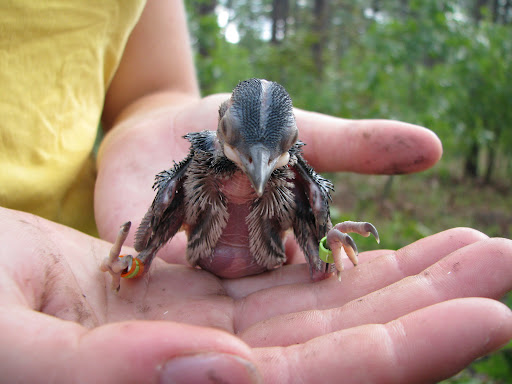
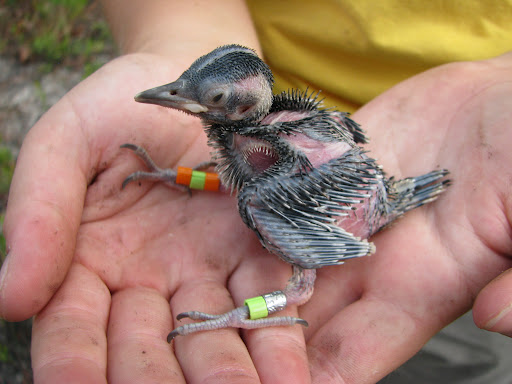
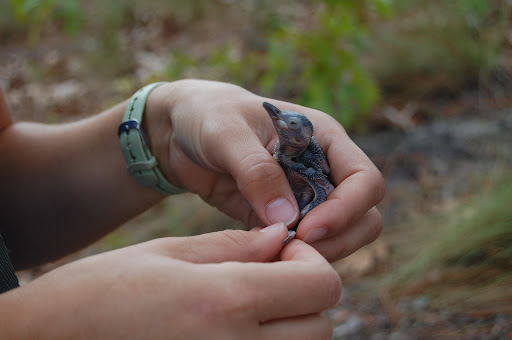
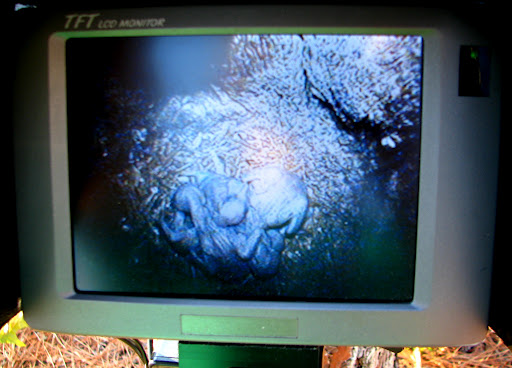
A RCW nestling, about 7 or 8 days old. Its eyes are unopened, and the feathers are just starting to come in and poke through the skin. Their feathers grow in tracts, the darkened areas on the bird’s head, back, and wings. It takes RCW’s about 20 days to become fully feathered and reach adult size.

———————————————————————————————–

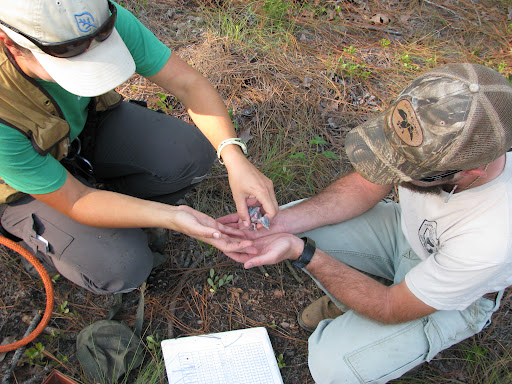
Woodpecker nestlings are altricial, which means they are born without feathers, eyes closed, and are pretty much helpless. It takes about 20 days for RCW nestlings to grow in their adult feathers. Juvenile males will have the distinctive red crown patches on their temples; females’ just plain black and white. I peep into cavities and look for splotches of red, jotting down the number of nestlings and their sex: male, female, or unknown, if they are being uncooperative and sitting on top of one another so I can’t see the back of their heads.

As I drive off through the refuge towards my first cavity, I hear the chatter of brown nuthatches in the pines to my left. They sound like so many squeaky toys, jumping around in the trees like little yippy dogs. Listening closely, every once in a while I hear the “sklit, sklit” of an RCW flying overhead.

———————————————————————————————————————-


1. Auburn Forestry site: The Longleaf Alliance

Additional Information

Blog posts about my experiences: 

How To Capture and Band a Mourning Dove

First you must bait the fields, which have been disked properly by an approved U.S. Fish and Wildlife employee. The area where the bait is placed must first be raked smooth, so the doves can see the bait and have a nice landing area to wander around in and leave footprints. You should probably not joke about leaving dirt angels (like a snow angel, but in dirt) when asked by your boss if you did raked and baited correctly. (What kind of question is that though, really?) Also you should probably not leave messages written in the dirt for said boss, though said boss never did see it.

Baiting the dove field.

After you put out the bait (sunflower seed is what we used) place a metal trap over the bait pile. There is an art to putting out bait. It must be perfectly arranged under the trap or the mourning doves won’t come. They’ll just hang out around the outsides of the traps and not go inside and get caught.

Whitney with the seed bucket.

After an hour or so, go back and check the traps. If there are doves in them, cover the trap with a sheet to calm them down so they don’t hurt themselves against the wire before you get them out.

Whitney removing a dove from the trap while Brady busies himself with the bands.

If you’re really lucky you’ll catch more than one or two doves at a time. However, in my experience, you only catch multiple doves when a big storm is blowing in and the last place you want to be is crouched over a metal trap in the middle of a wide-open field as the lightning gets closer and closer. Then you’ll catch 20 at a time. Other days, maybe 5.

Lauren removing a dove from the trap. Brady stands in the back being exceptionally useful.

After removing the mourning dove from the trap, determine age, sex, and molt status. If any of the feathers on the body and wings have buffy tips, it is a young (hatch year) bird. If it is a hatch year, then the sex is unknown. If it is an adult, males have a slate colored patch on the crown and rosy-tinted feathers on their breast. Females are plain and boring looking. Molt is determined by looking at the wing feathers and seeing which one is growing in, and therefore is shorter and a slightly different color than the older feathers.

Whitney figuring out molt status.

Once you have all that information figured out, a numbered band from the USGS is placed around the right leg of the dove. We were given 100 dove-sized bands, so once 100 are caught we’re done. The banding is done to help gather information about the doves during the dove hunt.

Brady preparing the bands.

Once the band is on, and the the information is written down, release the dove and start over!

Lauren with a dove.
You can’t really tell, but this is an adult male mourning dove. Most of the adults we catch are males.  Nancy thinks this is because males are dumber than females. Might make an interesting study…

Animals on the Refuge

Though you might not realize it from reading my blog, there are in fact other animals at Carolina Sandhills in addition to red-cockaded woodpeckers. Here are a few pictures of some of them and fellow intern Whitney’s arms. There may be a full-body shot in there somewhere too.

We found a turtle! This is a male yellow-bellied slider. Male because it’s flat on the bottom (in fancy terms his plastron is slightly concave). The theory is that this helps the males to climb on top of the females when they breed.

I like the shadow of Whitney’s hands and the turtle on the ground.

We found a small tiny lizard that tried to climb Whitney’s pant leg during one of our vegetation surveys.  Our best guess is eastern fence lizard. Whatever it is, it’s cute.

Whitney found a land snail and brought it in the kitchen! She was outside the bunkhouse one evening making a phone call, and found this dude on the stoop. Actually, this snail might be a dudette, or both (many snails are hermaphrodites) so let’s just stick with “dude.”

One afternoon as we were driving back to the office, we saw a dark shape lumbering down Wildlife Drive. We first thought it might be a raccoon, but as we got closer we realized it was a beaver. We stopped the truck a respectable distance away, got out, and took some pictures. Instead of staying away from us, the beaver strolled right up, crossed the road in front of the tuck, and trundled along just a few feet away from where Whitney was crouched taking pictures. It then crossed back over the road and headed into the pond.

Close encounters of the beaver kind.

The Beaver Song, which I learned from Chris at Aullwood Audubon Center and Farm. There are also hand motions, which I’d be more than happy to show you sometime. I only remember the chorus, which is a call and response.

Long tail (Long tail)
Big buck teeth (Big buck teeth)
Swimmin in the water (Swimmin in the water)
Chewing on trees (Chewing on trees)
Building up a dam (Building up a dam)
You know who I am (You know who I am)
I’m a Beaver, I’m a Beaver, I’m a Beaver! (I’m a Beaver. I’m a Beaver. I’m a Beaver!)

Swimming away, looking for trees to gnaw on.

Beavers can weigh up to 60lbs, and can be 23 to 39 inches long, excluding the tail, which adds an additional 8 to 12 inches. Not something you typically expect to see trucking down a paved road in the middle of the afternoon, especially as beavers are usually nocturnal.

And these pictures don’t have Whitney in them (and therefore are not nearly as interesting) but I did find this really neat insect while I was cleaning my peeper– the telescoping camera we use to look in woodpecker cavities. Not sure what it is, but it’s cool!

The Last RCW Banding

Friday was the last RCW banding of the 2012 season. It’s been a busy few months, and while it is nice to not be as busy (especially in this heat!) I am sad that there are no more trees to climb and ugly baby woodpeckers to play with. My time here at Carolina Sandhills is almost up, and it’s been fantastic. I am exceptionally glad I took this internship and was able to spend 12 weeks here working with RCW’s. Birds are always fun, and climbing trees is awesome, but I think the best part of this internship has been all the people I’ve been privileged to work with. While I’m not always excited about getting up early or having to tromp through the chigger/horse fly/ poison oak infested forest to look for cavity trees, every day is still fun because of the people here. I’m not sure where the future will take me after I leave this place, but I’ll never forget the experiences and people. Especially Brady Vaassen, fellow intern and one of my housemates, who is sitting here on the couch next to me asking when I’ll write a blog post about him and trying to get me to move so he can have the entire couch. Just because you’re 6ft 5in and a bit doesn’t mean you always get to hog the couch.

Pictures were taken by the fabulous Whitney Wallet, intern extraordinaire and friend of the first class.
20ft up a longleaf pine at a RCW cavity. And yes, I do have a turkey feather stuck in my hair.
Trying to get the nestling out of the cavity with my noose.
Nestling secured in the bag slung around my back, and heading down to the ground to get it banded.
Getting ready to band (or standing around looking important).  That’s Evan Brashier on the right (not an intern, he actually gets paid), he banded the chick since I got to climb up and noose it.
Chick in hand, I make my stand, ready to band, best in the land.
The passing of the RCW chick.
Evan banding the chick. It was about 9 or10 days old.
Climbing back up to put the newly-banded nestling back home.
I don’t normally get this excited about putting nestlings back, but there were some interesting comments coming from the peanut gallery on the ground (aka Whitney and Evan).

More RCW Banding

The red-cockaded woodpecker nesting season is dying down, and all the babies are starting to fly away. Here are some pictures, taken by myself, fellow intern Ashley and high school intern Katie, of the climbing/banding process.

Here I am starting to climb up the tree. I’ll go up another rung to where I can reach the bracket (just above my head on the ladder, against the tree) and then I’ll wrap a chain around the tree to secure the ladder. The ladders are in 10ft and 5ft segments, and have tongues on the ends to attach them together to whatever height we need. The highest I’ve ever had to climb was 30ft, or 3 10ft ladders.

At the cavity, getting ready to remove the chicks. The rubber tubing is my noose, which I stick in the cavity and use to grab the nestlings.

Hanging out 30ft above the ground. The view is generally pretty nice from up there.

Our banding kit. We put aluminum bands with unique numbers on each nestling, and also a unique combination of colored plastic bands. This is so we can later identify the birds without having to catch them again to read the tiny numbers on their legs. With binoculars or a spotting scope, you can sometimes (if the birds cooperate and permit you a good view of their legs) read the color combination.

This nestling has color bands yellow/white/yellow on its left leg, and an aluminum band/light green (which you can’t really see in this picture) on its right.

Two RCW nestlings, about 9 or 10 days old. Their eyes have just opened, and their feathers are starting to poke out along their wings and tails. The one on the right was feisty, and liked showing off his legs.

This chick was old, probably 11 or 12 days old. We generally try to band them between 7 and 11 days old, because they don’t have so many feathers for us to accidentally pull out. Also, it’s generally easier to get them before their eyes are open, because they’re not quite as aware of what’s going on and can’t see the noose and try to get out of the way.

Right leg: orange/light green/orange.
Left leg: aluminum/light green.

I like banding older chicks because their legs are bigger and it’s easier to get all the bands on, but, being older, they’ve figured out how to use all their body parts and with more actively struggle. This guy here has mastered his feet, and would grab our fingers. The younger birds, especially before their eyes are open, can barely stay upright in your hand.

Since most of our birds have finished nesting (we have about 128 nests) we are now starting our early morning cluster checks. This means we station ourselves by trees we think may be active (which means the woodpeckers are using them) before sunrise and wait to see if any RCW’s come out. We do this to see if the cluster has a potential breeding pair which just didn’t nest. Typically the birds will come out and then chat a little with their mate, who roosts in a different cavity, before heading out to look for breakfast. The real fun part (other than getting up at 5 a.m. to be in the woods before sunrise) is then following them around for an hour or so, to see if they lead us to nestlings or a new nesting cavity. We have spotting scopes (telescopes on tripods) that we use to see the colored bands, and we carry those around with us as we traipse around after the birds. It’s not too bad, if you don’t mind waking up really early and then chasing after birds in the woods. Which I don’t. Birds are one of the only things I’ll wake up before sunrise for. The others are traveling and rock climbing. Sometimes.

How to Band a Red-Cockaded Woodpecker

First, peep the cavity to make sure the young woodpeckers are in fact still in there, and have not had some horrible fate befall them, like being eaten by a snake. They will probably think that what you are about to do to them will be pretty horrible, but they’ll get over it.

You’re about to snatch them from their home, the only place they have ever seen in their entire lives, jostle them around, pull them out into the bright light and put some colored bits of plastic and aluminum on their tiny legs. You will then put them back into their cavity without eating them, but they don’t know that yet.

Peeping the cavity with the peeper, a camera on a telescoping pole. 


Next, you assemble your equipment: a climbing harness, short lengths of rope (to go around the tree), ladders, and your banding vest with a nestling pouch, gloves (to keep your hands from becoming encrusted with sap during the climb up), and corn starch (to de-stickify your hands so the baby RCW’s don’t adhere to your fingers). A hat or bandanna to keep the sap out of your hair is also a good idea.
Set the ladder against the tree, put your rope around the tree and attach it to your harness, and begin climbing. If the cavity is taller than 10 feet (the height of one ladder) you will have to use multiple ladders. This can be done by climbing to the top of the first ladder, and then having your ground crew (or your boss, who is watching you from the ground to make sure you don’t mess up) pass you up the second, which attaches to the top of the first. Each ladder has a chain that is wrapped around the tree and secured, so there is no danger of the ladders getting tired and deciding to head down to the ground without you.
Climbing up the tree.


The rope is attached to your harness and is wrapped around the tree. As you climb the ladder, move the rope up the tree with you.
At the cavity, getting ready to take out the nestlings.


Climb to the cavity and remove the nestlings (easier said than done. Let’s just say it’s like blind fishing). Put them in the nestling pouch around your neck. Be sure to sling it over your shoulder for the climb down so you don’t accidentally bump the nestlings against the ladder.
8 day old red-cockaded woodpecker nestling. 

Once safely on the ground, let the banding commence! On the left leg, each bird gets an aluminum band with a unique number and a colored plastic band. On the right leg, each bird gets a unique color combination of plastic bands (such as striped, dark green, orange– not a combination I’ve used so far, but I’m sure it’ll be used someday). This allows for identification of the individual without having to catch the bird and read the tiny number off the aluminum band. It’s much easier for both observer and observee if the biologist can use a spotting scope to read the color combinations from a distance.

Making sure to put the correct combination of bands on the chick is important, because those bands are not exactly easy to remove if they’re on in the wrong order.
Putting on the colored bands.
Banding. 
Climb back up the tree and plop the nestlings back into the cavity. Then climb back down, un-chaining the ladder as you do. Then gather up everything, put it in the truck, and head off to the next tree to climb.
Left leg with dark green colored band and aluminum band. 
Putting the babies safely back into their cavity. 
Oh yes, and don’t forget to have someone take lots of pictures of you during the whole process. That’s the whole point of this process, to have pictures of you doing something cool. Studying an endangered species is just a minor detail. 

Getting Buzzed by Common Nighthawks

Common Nighthawks are all over the place here at Carolina Sandhills National Wildlife Refuge, and I see them just about every day while I’m out peeping RCW cavities. They’re neat birds to see, and they have a fairly distinct, simple call:

Contrary to their name, Common Nighthawks are not hawks, but instead are in the same family as Whip-poor-wills (another really neat bird). These birds are generally most active at dusk and dawn, flying around snapping up insects while on the wing. I find that quite impressive, as my hand-mouth coordination isn’t always very good. Sometimes I have problems getting food to my mouth while seated at a table, and my stir-fry isn’t trying to fly away from me. I think I would starve if my broccoli and quinoa made me chase them down every day for dinner.

However, the males make another, much more unusual sound (as males are wont to do). It’s part of a display they perform during the breeding season, which is going on right now. Instead of having fancy plumes like a peacock or doing a special little moonwalk dance like red-capped manakins, Common Nighthawk males impress the ladies with aerial exploits, or by diving. Starting from what Cornell’s All About Birds refers to as “a moderate height,” the males dive straight for the ground, pulling up when they are about 2 meters, or 6-ish feet, off the ground. That’s pretty close to the ground, if you think about it. I’m 5’9″, which would put that just above my head. If one was diving at me, I would definitely cover my head and duck.

Not content with just an impressive dive, the males also have to make a weird noise, described as a buzzing or booming sound. This noise comes at the bottom of the dive, and is actually made by the air rushing through the male’s wingtips. Male nighthawks dive to impress the ladies and youngsters and to be macho and threatening to intruders, be they avian or human.

Most of the time the nighthawks are diving far enough away from me that I don’t mind or notice, but I’ll admit the other day one did make me jump. It was fairly close, though I couldn’t see exactly where because of the pines all around. Being startled while holding a very expensive piece of field equipment is never a good idea, especially when that field equipment is extended up 20+ feet in the air as you are pulling the camera out of a woodpecker cavity… However, this story ends well and nothing bad happened, except I decided to write a blog post about it. Which I tend to think is good instead of bad, though you are entitled to your own opinion.

Here are some cool videos I found on YouTube, after much time spent in diligent research. There are actually more nighthawk videos than I thought there would be, and of all those videos I chose two that I thought were quite good.

Enjoy!
This video doesn’t show the Common Nighthawks in diving action, but it does have excellent pictures and recordings of their calls. (The video is from Cornell Lab of Ornithology, so what do you expect?)
And here’s another video that someone took of a Common Nighthawk buzzing by.
It got pretty close!
Aren’t birds awesome?

How to Peep a Red-Cockaded Woodpecker

Currently, I am an intern at the Carolina Sandhills National Wildlife Refuge, located near McBee, South Carolina. I spend my days working with the biologists to study red-cockaded woodpeckers, an endangered species. These are pretty awesome birds, and it is very exciting to spend every day running around in the pines looking at a bird species that many people have never seen.

A bad picture of an adult Red-cockaded Woodpecker.

Here are step-by-step instructions for how to peep a Red-Cockaded Woodpecker (RCW for short):

1). Assemble your equipment. This includes a peeper (see picture) and battery, a massive 4-wheel drive government truck, a map, a compass, a notebook and a pencil. Water and food are also advisable, because you will be out all day. Also a radio or cell phone so when you get lost you can call someone.

  • Note: everything will become covered with sap from the pine trees. Everything. It does come off, eventually.
A peeper. It is leaning on a RCW cavity tree, marked with white paint and a numbered metal tag. There is another RCW tree in the background.
This thing is a beast. I have yet to come up with an appropriate name. I have also yet to get stuck, though not for lack of trying. Apparently I am not very good at choosing places to turn around. 4-wheel drive rocks. Hard.

2). Using your map, locate and drive to your first cluster of RCW cavities.

  • Note: the scale on the map is not what one would call accurate. Nor are the trees placed on the map in their exact locations in relation to the road or the other trees in the cluster. Sometimes the trees will not be on the map at all. All of the cavity trees are marked with a stripe of white paint at about chest height, but this does not necessarily make them easy to find, especially when the turkey oak has grown up to exactly the height of the stripes. In this instance you will make an educated guess as to what direction to go in and head that way. You will probably be wandering around in the woods searching for trees for at least 20-odd minutes. You may not find some of the trees until you have given up and decided to head back to the truck. Also: It is helpful to remember where you left the truck, so you can find your way back at some point. The compass comes in handy for this.
This is compartment 9. There are 21 total compartments, with usually around 12 clusters (the red circles) of RCW cavities in each compartment.
  • You will not find all of the trees, even when you are standing exactly where the tree should be according to the map. As previously mentioned, the map is occasionally wrong about tree placement, or omits trees altogether. Frustration levels directly correlate with the humidity/temperature and blood sugar levels. Foul words will emit from your mouth.
I hate cluster 7. Hate. With a passion.
I was searching for tree 109, which it turns out is not in front of tree 64, as shown on the map, but instead a good quarter-mile behind it, right next to tree 98, which was also not on the map. I penciled them in after I eventually found them on Friday. When you stand in front of tree 64, where tree 109 should be, you can see all the other trees, but not 109 (because it’s actually a quarter-mile behind you, hidden in the pine plantation). The first time I went looking for tree 109 it was late in the afternoon, I was hungry, and I was this close to kicking a tree or throwing myself on the ground and having a minor temper-tantrum. But that would hurt, and I’m not a fan of poison ivy, so instead I went back to the truck, turned on the A/C, and blasted the radio. Carry On Wayward Son by Kansas does wonders.
  • Also note: foul words will frequently emit from your vocal chords, so perhaps it’s a good thing that you’re sent out alone to find the RCW trees.

3). Once you have arrived at the first tree to peep:

  • First bang on the bottom of the tree with a stick, so that if a RCW is in the cavity it will vacate so you can stick in the camera. As the agitated RCW parent flies out of the cavity, assure them you will be quick and not hurt their babies/eggs. Continue talking to RCW’s in area for duration of time at tree. Again, it’s perhaps a good thing you were sent out alone in the woods.
  • Next, extend the telescoping pole with the camera up to the cavity and stick the camera in the hole.
  • Note: if the hole is 20 feet or lower, it will be relatively easy and you will feel overconfident of your abilities to peep. If the cavity is 20 feet or higher, it will be much harder to get the camera into the cavity. It will also be windy, especially if the cavity you are trying to peep is 30+ feet. The sun will also be shining directly into your eyes as you look up at the tree to direct the small, fist-sized camera into the woodpecker cavity. If you are really lucky, it will be both windy and sunny, and the cavity will be slightly higher than 35 feet, which is the total length of your telescoping pole, so you’ll have to lift the whole thing to get it up that few extra inches.
  • Also, the higher and more difficult the cavity to reach with the peeper (i.e., branches in the way you have to maneuver around) the greater likelihood the battery in the camera will die by the time you get it into the cavity. The battery will only run out of juice once you’ve extended the peeper, not while on the ground when it would be easy to change. Some of the batteries will last a day and a half, others will not. They all look the same, and there is no way to tell how long the battery will last. However, it will always run out at an inopportune moment.
  • Also note: the peeper is a $3,000 piece of equipment, which costs more than all of the possessions you brought with you, including your car, laptop, and rock climbing/camping equipment. So while you are stumbling around in the woods looking for RCW trees, don’t hit it on anything, or drop it, or let it get wet when it rains, and when you’re driving around on the bumpy “roads” on the refuge, make sure it doesn’t jostle around in the truck. The $1.87/hr you make ($75/week, 40hrs/week) for this internship will not go very far towards a new one. So be careful.

4). The wireless camera on the end of the pole will transmit an image to the LCD screen at the peeper base, where you are. You will probably have to jiggle the antenna around in order to get a clear image of what is in the cavity.

5). Write down what you see in the cavity (chips, eggs, nestlings, flying squirrels, RCW’s, nothing) in your notebook.

Adult RCW on eggs, refusing to budge out of the cavity so I can see how many. Not cool dude, not cool.
Three RCW fledglings. Baby woodpeckers are not cute, they are featherless little blobs with giant heads and they flail about helplessly, trying to hide under each other when you stick the camera in.

Below is a video I took of some flying squirrels all piled up in a RCW cavity. I’ve only ever been able to see three at a time, but I’m sure they pack themselves in pretty good. I guess the ones on the top are the low guys on the totem pole, because they’re the ones that would get picked off first if someone tries to reach in there for a flying squirrel snack during the day.

Four RCW eggs in a cavity.

6). Pull the camera down, and get your hands covered in sap. Somehow throughout the day you will get sap on your hands, shirt, pants, shoes, notebook, pencil, water bottle, steering wheel, and sunglasses. Periodically worry about it getting into your hair and having to cut it out/shave your head. Then decide that this might be the way to go, as it’d probably be pretty cool (temperature-wise, not in any other -wise) in the summer.

7). Drop your pencil in the poison ivy/oak growing everywhere around base of tree (this step is optional, and highly probable).

8). Gather up all your things, variously forgetting the battery, maps, beating stick, and pencil at different trees.

  • Note: the peeper is not exactly heavy, but throughout the day starts to weigh more and more. When you have extensive hikes, it is recommended to switch shoulders, unless you prefer to cultivate a permanent bruise on just one shoulder. Your shoulder will most likely be tender for the next 10 weeks of the internship.

9). Once in the truck, buckle in the peeper for the ride to the next cluster.

10). Forget you probably have poison ivy all over your hands and rub your face/eat lunch without washing hands.

11). Repeat until 4 p.m., when you’re done for the day.

This is pretty much how I spend my days. Even when I’m lost, hot, sweaty, covered in sap and being bitten by flies, I still can’t get over how lucky I am to get to do things like this. Being a field biologist (or intern) is the best job ever!